This is the multi-page printable view of this section. Click here to print.
Networking
- 1: Secure connectivity with CNI and Network Policy
- 2: Replace EKS Anywhere Cilium with a custom CNI
- 3: Cilium supported by AWS
- 4: Multus CNI plugin configuration
1 - Secure connectivity with CNI and Network Policy
Announcements
- EKS Anywhere release
v0.24.0introduces the First-Party Supported Cilium as the default Cilium CNI in an EKS Anywhere cluster. The image for First-Party Supported Cilium is available in AWS public ECR gallery https://gallery.ecr.aws/eks/cilium/cilium. It is recommended to use this first-party supported Cilium which has been tested by AWS as the CNI in your cluster.
EKS Anywhere uses Cilium for pod networking and security.
Cilium is installed by default as a Kubernetes CNI plugin and so is already running in your EKS Anywhere cluster.
This section provides information about:
-
Understanding Cilium components and requirements
-
Validating your Cilium networking setup.
-
Using Cilium to securing workload connectivity using Kubernetes Network Policy.
Cilium Features
The following table lists Cilium features and notes which of those features are built into EKS Anywhere’s default Cilium version , upstream Open Source, and Cilium Enterprise.
Expand to see Cilium Features
| Headline/Feature | EKS Anywhere Default Cilium | Cilium OSS | Isovalent Cilium Enterprise |
|---|---|---|---|
| Networking Routing with tunneling mode | ✔ | ✔ | ✔ |
| Networking Routing with native routing mode | ✔ | ✔ | ✔ |
| Kubernetes Host Scope IPAM | ✔ | ✔ | ✔ |
| Kubernetes Network Policy | ✔ | ✔ | ✔ |
| Egress Masquerade | ✔ | ✔ | ✔ |
| CNI Exclusive Configuration | ✔ | ✔ | ✔ |
| Policy Enforcement Modes | ✔ | ✔ | ✔ |
| Load-Balancing (L3/L4) | ✔ | ✔ | ✔ |
| Advanced Network Policy & Encryption (DNS, L7, TLS/SNI, …) | — | ✔ | ✔ |
| Ingress, Gateway API, & Service Mesh | — | ✔ | ✔ |
| Multi-Cluster, Egress Gateway, BGP | — | — | ✔ |
| Hubble Network Observability (Metrics, Logs, Prometheus, Grafana, OpenTelemetry) | — | ✔ | ✔ |
| SIEM Integration & Timescape Observability Storage | — | — | ✔ |
| Tetragon Runtime Security | — | — | ✔ |
| Enterprise-hardened Cilium Distribution, Training, 24x7 Enterprise Grade Support | — | — | ✔ |
Cilium Components
The primary Cilium Agent runs as a DaemonSet on each Kubernetes node. Each cluster also includes a Cilium Operator Deployment to handle certain cluster-wide operations. For EKS Anywhere, Cilium is configured to use the Kubernetes API server as the identity store, so no etcd cluster connectivity is required.
In a properly working environment, each Kubernetes node should have a Cilium Agent pod (cilium-WXYZ) in “Running” and ready (1/1) state.
By default there will be two
Cilium Operator pods (cilium-operator-123456-WXYZ) in “Running” and ready (1/1) state on different Kubernetes nodes for high-availability.
Run the following command to ensure all cilium related pods are in a healthy state.
kubectl get pods -n kube-system | grep cilium
Example output for this command in a 3 node environment is:
kube-system   cilium-fsjmd                                1/1     Running           0          4m
kube-system   cilium-nqpkv                                1/1     Running           0          4m
kube-system   cilium-operator-58ff67b8cd-jd7rf            1/1     Running           0          4m
kube-system   cilium-operator-58ff67b8cd-kn6ss            1/1     Running           0          4m
kube-system   cilium-zz4mt                                1/1     Running           0          4m
Network Connectivity Requirements
To provide pod connectivity within an on-premises environment, the Cilium agent implements an overlay network using the GENEVE tunneling protocol. As a result, UDP port 6081 connectivity MUST be allowed by any firewall running between Kubernetes nodes running the Cilium agent.
Allowing ICMP Ping (type = 8, code = 0) as well as TCP port 4240 is also recommended in order for Cilium Agents to validate node-to-node connectivity as part of internal status reporting.
Validating Connectivity
Install the latest version of Cilium CLI . The Cilium CLI has connectivity test functionality to validate proper installation and connectivity within a Kubernetes cluster.
By default, Cilium CLI will run tests in the cilium-test-1 namespace which can be changed by using --test-namespace flag. For example:
cilium connectivity test
Successful test output will show all tests in a “successful” (some tests might be in “skipped”) state. For example:
✅ [cilium-test-1] All 12 tests (139 actions) successful, 72 tests skipped, 0 scenarios skipped.
Afterward, simply delete the namespace to clean-up the connectivity test:
kubectl delete ns cilium-test-1
Kubernetes Network Policy
By default, all Kubernetes workloads within a cluster can talk to any other workloads in the cluster, as well as any workloads outside the cluster. To enable a stronger security posture, Cilium implements the Kubernetes Network Policy specification to provide identity-aware firewalling / segmentation of Kubernetes workloads.
Network policies are defined as Kubernetes YAML specifications that are applied to a particular namespaces to describe that connections should be allowed to or from a given set of pods. These network policies are “identity-aware” in that they describe workloads within the cluster using Kubernetes metadata like namespace and labels, rather than by IP Address.
Basic network policies are validated as part of the above Cilium connectivity check test.
For next steps on leveraging Network Policy, we encourage you to explore:
-
A hands-on Network Policy Intro Tutorial .
-
The visual Network Policy Editor .
-
The #networkpolicy channel on Cilium Slack .
-
Other resources on networkpolicy.io .
Additional Cilium Features
Some advanced features of Cilium are not enabled as part of EKS Anywhere, including:
- Hubble observability
- DNS-aware and HTTP-Aware Network Policy
- Multi-cluster Routing
- Transparent Encryption
- Advanced Load-balancing
Please contact the EKS Anywhere team if you are interested in leveraging these advanced features along with EKS Anywhere.
2 - Replace EKS Anywhere Cilium with a custom CNI
This page provides walkthroughs on replacing the EKS Anywhere Cilium with a custom CNI. For more information on CNI customization see Use a custom CNI .
Note
- Starting from EKS Anywhere
v0.24.0release, the EKS Anywhere default Cilium will change from the Isovalent Cilium to the open-source AWS First-Party Supported Cilium. It is recommended to use this first-party supported Cilium which has been tested by AWS as the CNI in your cluster. When replacing EKS Anywhere Cilium with a custom CNI, it is your responsibility to manage the CNI, including version upgrades and support.
Prerequisites
- EKS Anywhere v0.15+.
- Cilium CLI v0.14.
Add a custom CNI to a new cluster
If an operator intends to uninstall EKS Anywhere Cilium from a new cluster they can enable the skipUpgrade option when creating the cluster.
Any future upgrades to the newly created cluster will not have EKS Anywhere Cilium upgraded.
-
Generate a cluster configuration according to the Getting Started section.
-
Modify the
Clusterobject’sspec.clusterNetwork.cniConfig.cilium.skipUpgradefield to equaltrue.
apiVersion: anywhere.eks.amazonaws.com/v1alpha1
kind: Cluster
metadata:
    name: eks-anywhere
spec:
  clusterNetwork:
    cniConfig:
      cilium:
        skipUpgrade: true
  ...
-
Create the cluster according to the Getting Started guide.
-
Pause reconciliation of the cluster. This ensures EKS Anywhere components do not attempt to remediate issues arising from a missing CNI.
kubectl --kubeconfig=MANAGEMENT_KUBECONFIG -n eksa-system annotate clusters.cluster.x-k8s.io WORKLOAD_CLUSTER_NAME cluster.x-k8s.io/paused=true
-
Uninstall EKS Anywhere Cilium.
cilium uninstall -
Install a custom CNI.
-
Resume reconciliation of the cluster object.
kubectl --kubeconfig=MANAGEMENT_KUBECONFIG -n eksa-system annotate clusters.cluster.x-k8s.io WORKLOAD_CLUSTER_NAME cluster.x-k8s.io/paused-
Add a custom CNI to an existing cluster with eksctl
- Modify the existing
Clusterobject’sspec.clusterNetwork.cniConfig.cilium.skipUpgradefield to equaltrue.
apiVersion: anywhere.eks.amazonaws.com/v1alpha1
kind: Cluster
metadata:
    name: eks-anywhere
spec:
  clusterNetwork:
    cniConfig:
      cilium:
        skipUpgrade: true
  ...
-
Pause reconciliation of the cluster. This ensures EKS Anywhere components do not attempt to remediate issues arising from a missing CNI.
kubectl --kubeconfig=MANAGEMENT_KUBECONFIG -n eksa-system annotate clusters.cluster.x-k8s.io WORKLOAD_CLUSTER_NAME cluster.x-k8s.io/paused=true
-
Uninstall EKS Anywhere Cilium.
cilium uninstall -
Install a custom CNI.
-
Resume reconciliation of the cluster object.
kubectl --kubeconfig=MANAGEMENT_KUBECONFIG -n eksa-system annotate clusters.cluster.x-k8s.io WORKLOAD_CLUSTER_NAME cluster.x-k8s.io/paused-
Add a custom CNI to an existing cluster with Lifecycle Controller
Warning
Clusters created using the Full Lifecycle Controller prior to v0.15 that have removed the EKS Anywhere Cilium CNI must manually populate their cluster.anywhere.eks.amazonaws.com object with the following annotation to ensure EKS Anywhere does not attempt to re-install EKS Anywhere Cilium.
anywhere.eks.amazonaws.com/eksa-cilium: ""
- Modify the existing
Clusterobject’sspec.clusterNetwork.cniConfig.cilium.skipUpgradefield to equaltrue.
apiVersion: anywhere.eks.amazonaws.com/v1alpha1
kind: Cluster
metadata:
    name: eks-anywhere
spec:
  clusterNetwork:
    cniConfig:
      cilium:
        skipUpgrade: true
  ...
-
Apply the cluster configuration to the cluster and await successful object reconciliation.
kubectl apply -f <cluster config path> -
Pause reconciliation of the cluster. This ensures EKS Anywhere components do not attempt to remediate issues arising from a missing CNI.
kubectl --kubeconfig=MANAGEMENT_KUBECONFIG -n eksa-system annotate clusters.cluster.x-k8s.io WORKLOAD_CLUSTER_NAME cluster.x-k8s.io/paused=true
- Uninstall EKS Anywhere Cilium.
cilium uninstall
-
Install a custom CNI.
-
Resume reconciliation of the cluster object.
kubectl --kubeconfig=MANAGEMENT_KUBECONFIG -n eksa-system annotate clusters.cluster.x-k8s.io WORKLOAD_CLUSTER_NAME cluster.x-k8s.io/paused-
3 - Cilium supported by AWS
Overview
As of EKS Anywhere v0.24, EKS Anywhere installs an AWS build of Cilium with all the features of open source Cilium as the default Kubernetes CNI plugin. Previous versions of EKS Anywhere included a Cilium build with a limited set of features compared to open source Cilium. With this update, for clusters with an EKS Anywhere Enterprise Subscription license, AWS will continue to provide technical support for Networking Routing (CNI), Identity-Based Network Policy (Labels, CIDR), and Load-Balancing (L3/L4) capabilities of Cilium, but you no longer need to replace the default EKS Anywhere CNI to use other capabilities available with open source Cilium. If you plan to use functionality outside the scope of AWS support, AWS recommends obtaining alternative commercial support for Cilium or have the in-house expertise to troubleshoot and contribute fixes to the Cilium project.
EKS Anywhere supports two approaches for managing the versions of the Cilium build maintained by AWS:
- AWS build of Cilium with automatic version upgrades:: EKS Anywhere automatically manages Cilium installation and upgrades (default behavior)
- AWS build of Cilium with self-managed version upgrades: You manage Cilium deployment using Helm while using AWS-maintained images from the public ECR registry
The AWS build of Cilium version provides images that include security patches and bug fixes validated by Amazon, available at public.ecr.aws/eks/cilium/cilium.
Installing AWS build of Cilium with automatic version upgrades
If you want to use the full open source Cilium version with advanced features, the transition is seamless and requires no configuration changes. AWS provides support for the subset of Cilium features mentioned in the Overview section above. You can customize Cilium settings using the helmValues parameter (see Helm Values Configuration for Cilium Plugin
).
Installing AWS build of Cilium with self-managed version upgrades
If you want to continue managing the Cilium CNI version yourself while using the AWS build of Cilium, you can install the AWS build of Cilium using Helm.
Prerequisites
- Helm 3.x installed
- Access to your EKS Anywhere cluster with
kubectlconfigured - Appropriate permissions to manage resources in the
kube-systemnamespace
Installation
Install the AWS build of Cilium version using Helm (replace 1.17.6-0 with your desired version from https://gallery.ecr.aws/eks/cilium/cilium):
helm install cilium oci://public.ecr.aws/eks/cilium/cilium \
  --version 1.17.6-0 \
  --namespace kube-system \
  --set envoy.enabled=false \
  --set ingressController.enabled=false \
  --set loadBalancer.l7.backend=none
Pros and Cons
Pros:
- Access to full Cilium open source features with AWS support for a subset of features
- Security patches and bug fixes handled by AWS
- Control over upgrade timing and version selection
- Greater flexibility to customize Cilium configuration
Cons:
- You are responsible for upgrading and validating Cilium versions
- Additional operational overhead for validating that your Cilium version is compatible with your Kubernetes version
- No automatic upgrades during EKS Anywhere cluster upgrades
Migrating from upstream open source Cilium to AWS build of Cilium
If you’re currently running the upstream open source Cilium version and want to switch to the AWS build of Cilium, you can perform an in-place upgrade using Helm. This migration allows you to benefit from images maintained by AWS while preserving your existing Cilium configuration and network policies.
The AWS build of Cilium uses images from the AWS public ECR registry (public.ecr.aws/eks/cilium/cilium) and includes security patches and bug fixes validated by AWS. This upgrade is performed as a rolling update, minimizing disruption to your workloads.
To perform the migration, run :
helm upgrade cilium oci://public.ecr.aws/eks/cilium/cilium \
  --version 1.17.6-0 \
  --namespace kube-system \
  --set envoy.enabled=false \
  --set ingressController.enabled=false \
  --set loadBalancer.l7.backend=none
Cilium 1.17.6 is the only Cilium version that AWS currently builds.
After the upgrade, verify the installation status:
cilium status --wait
Expected output showing AWS ECR images:
    /¯¯\
 /¯¯\__/¯¯\    Cilium:             OK
 \__/¯¯\__/    Operator:           OK
 /¯¯\__/¯¯\    Envoy DaemonSet:    disabled (using embedded mode)
 \__/¯¯\__/    Hubble Relay:       disabled
    \__/       ClusterMesh:        disabled

DaemonSet              cilium                   Desired: 4, Ready: 4/4, Available: 4/4
Deployment             cilium-operator          Desired: 2, Ready: 2/2, Available: 2/2
Containers:            cilium                   Running: 4
                       cilium-operator          Running: 2
                       clustermesh-apiserver
                       hubble-relay
Cluster Pods:          17/17 managed by Cilium
Helm chart version:    1.17.6-0
Image versions         cilium             public.ecr.aws/eks/cilium/cilium:v1.17.6-0: 4
                       cilium-operator    public.ecr.aws/eks/cilium/operator-generic:v1.17.6-0: 2
After aligning your Cilium installation with the AWS-supported version, you can optionally transition management of Cilium upgrades to EKS Anywhere.This allows EKS Anywhere to automatically upgrade your Cilium deployment to the latest AWS build of Cilium for the Kubernetes you are upgrading to, reducing operational overhead.
To complete the transition:
-
Upgrade Your Cluster: Upgrade your cluster to the latest EKS Anywhere version.
-
Toggle the skipUpgrade Configuration: Modify the
skipUpgradesetting in your cluster configuration:kubectl edit cluster <cluster-name>Choose one of the following options:
Option 1: Remove the
skipUpgradeline entirely and use default settings:cilium: {}Option 2: Explicitly set
skipUpgradeto false:cilium: skipUpgrade: false -
Save and Exit: Save the configuration file and exit the editor.
Once configured, EKS Anywhere will automatically manage Cilium upgrades during cluster upgrades, ensuring compatibility and reducing manual maintenance.
4 - Multus CNI plugin configuration
NOTE: Currently, Multus support is only available with the EKS Anywhere Bare Metal provider. The vSphere and CloudStack providers, do not have multi-network support for cluster machines. Once multiple network support is added to those clusters, Multus CNI can be supported.
Multus CNI is a container network interface plugin for Kubernetes that enables attaching multiple network interfaces to pods. In Kubernetes, each pod has only one network interface by default, other than local loopback. With Multus, you can create multi-homed pods that have multiple interfaces. Multus acts a as ‘meta’ plugin that can call other CNI plugins to configure additional interfaces.
Pre-Requisites
Given that Multus CNI is used to create pods with multiple network interfaces, the cluster machines that these pods run on need to have multiple network interfaces attached and configured. The interfaces on multi-homed pods need to map to these interfaces on the machines.
For Bare Metal clusters using the Tinkerbell provider, the cluster machines need to have multiple network interfaces cabled in and appropriate network configuration put in place during machine provisioning.
Overview of Multus setup
The following diagrams show the result of two applications (app1 and app2) running in pods that use the Multus plugin to communicate over two network interfaces (eth0 and net1) from within the pods. The Multus plugin uses two network interfaces on the worker node (eth0 and eth1) to provide communications outside of the node.
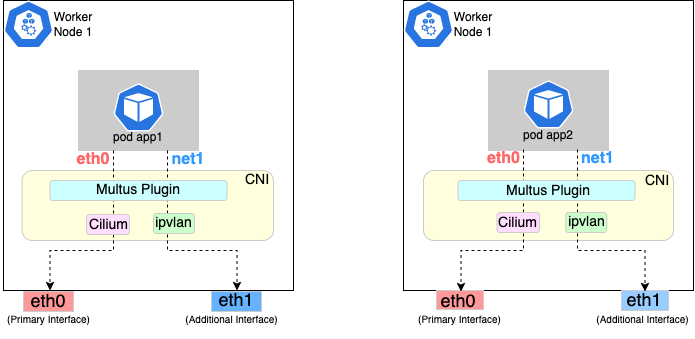
Follow the procedure below to set up Multus as illustrated in the previous diagrams.
Install and configure Multus
Deploying Multus using a Daemonset will spin up pods that install a Multus binary and configure Multus for usage in every node in the cluster. Here are the steps for doing that.
-
Clone the Multus CNI repo:
git clone https://github.com/k8snetworkplumbingwg/multus-cni.git && cd multus-cni -
Apply Multus daemonset to your EKS Anywhere cluster:
kubectl apply -f ./deployments/multus-daemonset-thick-plugin.yml -
Verify that you have Multus pods running:
kubectl get pods --all-namespaces | grep -i multus -
Check that Multus is running:
kubectl get pods -A | grep multusOutput:
kube-system kube-multus-ds-bmfjs     1/1      Running      0      3d1h
kube-system kube-multus-ds-fk2sk     1/1      Running      0      3d1h
Create Network Attachment Definition
You need to create a Network Attachment Definition for the CNI you wish to use as the plugin for the additional interface.
You can verify that your intended CNI plugin is supported by ensuring that the binary corresponding to that CNI plugin is present in the node’s /opt/cni/bin directory.
Below is an example of a Network Attachment Definition yaml:
cat <<EOF | kubectl create -f -
apiVersion: "k8s.cni.cncf.io/v1"
kind: NetworkAttachmentDefinition
metadata:
   name: ipvlan-conf
spec:
   config: '{
      "cniVersion": "0.3.0",
      "type": "ipvlan",
      "master": "eth1",
      "mode": "l3",
      "ipam": {
         "type": "host-local",
         "subnet": "198.17.0.0/24",
         "rangeStart": "198.17.0.200",
         "rangeEnd": "198.17.0.216",
         "routes": [
             { "dst": "0.0.0.0/0" }
         ],
         "gateway": "198.17.0.1"
      }
 }'
EOF
Note that eth1 is used as the master parameter.
This master parameter should match the interface name on the hosts in your cluster.
Verify the configuration
Type the following to verify the configuration you created:
kubectl get network-attachment-definitions
kubectl describe network-attachment-definitions ipvlan-conf
Deploy sample applications with network attachment
-
Create a sample application 1 (app1) with network annotation created in the previous steps:
cat <<EOF | kubectl apply -f - apiVersion: v1 kind: Pod metadata: name: app1 annotations: k8s.v1.cni.cncf.io/networks: ipvlan-conf spec: containers: - name: app1 command: ["/bin/sh", "-c", "trap : TERM INT; sleep infinity & wait"] image: alpine EOF -
Create a sample application 2 (app2) with the network annotation created in the previous step:
cat <<EOF | kubectl apply -f - apiVersion: v1 kind: Pod metadata: name: app2 annotations: k8s.v1.cni.cncf.io/networks: ipvlan-conf spec: containers: - name: app2 command: ["/bin/sh", "-c", "trap : TERM INT; sleep infinity & wait"] image: alpine EOF -
Verify that the additional interfaces were created on these application pods using the defined network attachment:
kubectl exec -it app1 -- ip aOutput:
1: lo: <LOOPBACK,UP,LOWER_UP> mtu 65536 qdisc noqueue state UNKNOWN qlen 1000
    link/loopback 00:00:00:00:00:00 brd 00:00:00:00:00:00
    inet 127.0.0.1/8 scope host lo
       valid_lft forever preferred_lft forever
    inet6 ::1/128 scope host
       valid_lft forever preferred_lft forever
*2: net1@if3: <BROADCAST,MULTICAST,NOARP,UP,LOWER_UP,M-DOWN> mtu 1500 qdisc noqueue state UNKNOWN
    link/ether 00:50:56:9a:84:3b brd ff:ff:ff:ff:ff:ff
    inet 198.17.0.200/24 brd 198.17.0.255 scope global net1
       valid_lft forever preferred_lft forever
    inet6 fe80::50:5600:19a:843b/64 scope link
       valid_lft forever preferred_lft forever*
31: eth0@if32: <BROADCAST,MULTICAST,UP,LOWER_UP,M-DOWN> mtu 1500 qdisc noqueue state UP
    link/ether 0a:9e:a0:b4:21:05 brd ff:ff:ff:ff:ff:ff
    inet 192.168.1.218/32 scope global eth0
       valid_lft forever preferred_lft forever
    inet6 fe80::89e:a0ff:feb4:2105/64 scope link
       valid_lft forever preferred_lft forever
kubectl exec -it app2 -- ip aOutput:
1: lo: <LOOPBACK,UP,LOWER_UP> mtu 65536 qdisc noqueue state UNKNOWN qlen 1000
    link/loopback 00:00:00:00:00:00 brd 00:00:00:00:00:00
    inet 127.0.0.1/8 scope host lo
       valid_lft forever preferred_lft forever
    inet6 ::1/128 scope host
       valid_lft forever preferred_lft forever
*2: net1@if3: <BROADCAST,MULTICAST,NOARP,UP,LOWER_UP,M-DOWN> mtu 1500 qdisc noqueue state UNKNOWN
    link/ether 00:50:56:9a:84:3b brd ff:ff:ff:ff:ff:ff
    inet 198.17.0.201/24 brd 198.17.0.255 scope global net1
       valid_lft forever preferred_lft forever
    inet6 fe80::50:5600:29a:843b/64 scope link
       valid_lft forever preferred_lft forever*
33: eth0@if34: <BROADCAST,MULTICAST,UP,LOWER_UP,M-DOWN> mtu 1500 qdisc noqueue state UP
    link/ether b2:42:0a:67:c0:48 brd ff:ff:ff:ff:ff:ff
    inet 192.168.1.210/32 scope global eth0
       valid_lft forever preferred_lft forever
    inet6 fe80::b042:aff:fe67:c048/64 scope link
       valid_lft forever preferred_lft forever
Note that both pods got the new interface net1. Also, the additional network interface on each pod got assigned an IP address out of the range specified by the Network Attachment Definition.
-
Test the network connectivity across these pods for Multus interfaces:
kubectl exec -it app1 -- ping -I net1 198.17.0.201Output:
PING 198.17.0.201 (198.17.0.201): 56 data bytes
64 bytes from 198.17.0.201: seq=0 ttl=64 time=0.074 ms
64 bytes from 198.17.0.201: seq=1 ttl=64 time=0.077 ms
64 bytes from 198.17.0.201: seq=2 ttl=64 time=0.078 ms
64 bytes from 198.17.0.201: seq=3 ttl=64 time=0.077 ms
kubectl exec -it app2 -- ping -I net1 198.17.0.200Output:
PING 198.17.0.200 (198.17.0.200): 56 data bytes
64 bytes from 198.17.0.200: seq=0 ttl=64 time=0.074 ms
64 bytes from 198.17.0.200: seq=1 ttl=64 time=0.077 ms
64 bytes from 198.17.0.200: seq=2 ttl=64 time=0.078 ms
64 bytes from 198.17.0.200: seq=3 ttl=64 time=0.077 ms