Overview
Creating a Nutanix cluster
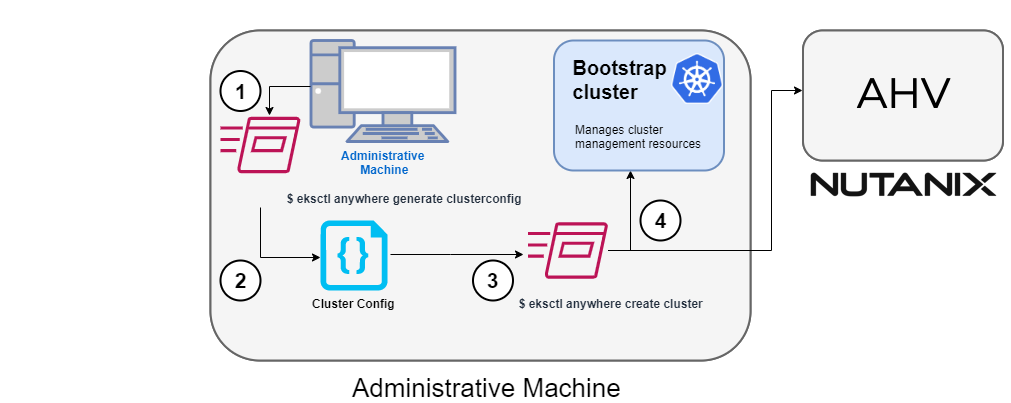
The following diagram illustrates the cluster creation process for the Nutanix provider.
Start creating a Nutanix cluster

1. Generate a config file for Nutanix
Identify the provider (--provider nutanix) and the cluster name in the eksctl anywhere generate clusterconfig command and direct the output to a cluster config .yaml file.
2. Modify the config file
Modify the generated cluster config file to suit your situation. Details about this config file can be found on the Nutanix Config page.
3. Launch the cluster creation
After modifying the cluster configuration file, run the eksctl anywhere cluster create command, providing the cluster config.
The verbosity can be increased to see more details on the cluster creation process (-v=9 provides maximum verbosity).
4. Create bootstrap cluster
The cluster creation process starts with creating a temporary Kubernetes bootstrap cluster on the Administrative machine.
First, the cluster creation process runs a series of commands to validate the Nutanix environment:
- Checks that the Nutanix environment is available.
- Authenticates the Nutanix provider to the Nutanix environment using the supplied Prism Central endpoint information and credentials.
For each of the NutanixMachineConfig objects, the following validations are performed:
- Validates the provided resource configuration (CPU, memory, storage)
- Validates the Nutanix subnet
- Validates the Nutanix Prism Element cluster
- Validates the image
- (Optional) Validates the Nutanix project
If all validations pass, you will see this message:
✅ Nutanix Provider setup is valid
During bootstrap cluster creation, the following messages will be shown:
Creating new bootstrap cluster
Provider specific pre-capi-install-setup on bootstrap cluster
Installing cluster-api providers on bootstrap cluster
Provider specific post-setup
Next, the Nutanix provider will create the machines in the Nutanix environment.
Continuing cluster creation
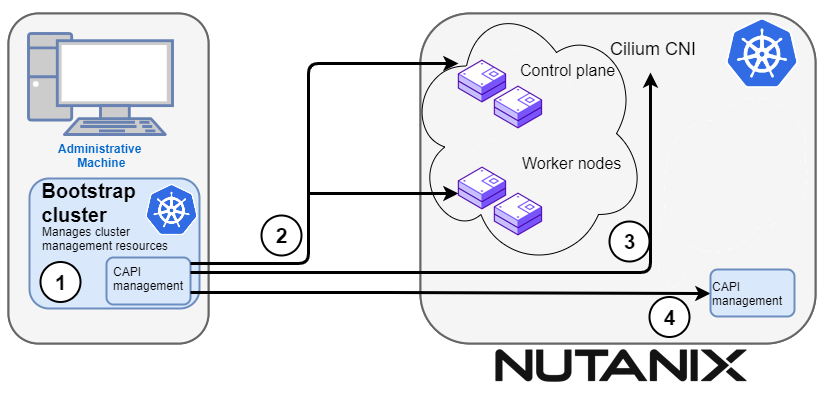
The following diagram illustrates the activities that occur next:

1. CAPI management
Cluster API (CAPI) management will orchestrate the creation of the target cluster in the Nutanix environment.
Creating new workload cluster
2. Create the target cluster nodes
The control plane and worker nodes will be created and configured using the Nutanix provider.
3. Add Cilium networking
Add Cilium as the CNI plugin to use for networking between the cluster services and pods.
Installing networking on workload cluster
4. Moving cluster management to target cluster
CAPI components are installed on the target cluster. Next, cluster management is moved from the bootstrap cluster to the target cluster.
Creating EKS-A namespace
Installing cluster-api providers on workload cluster
Installing EKS-A secrets on workload cluster
Installing resources on management cluster
Moving cluster management from bootstrap to workload cluster
Installing EKS-A custom components (CRD and controller) on workload cluster
Installing EKS-D components on workload cluster
Creating EKS-A CRDs instances on workload cluster
4. Saving cluster configuration file
The cluster configuration file is saved.
Writing cluster config file
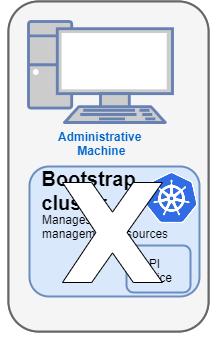
5. Delete bootstrap cluster
The bootstrap cluster is no longer needed and is deleted when the target cluster is up and running:

The target cluster can now be used as either:
- A standalone cluster (to run workloads) or
- A management cluster (to optionally create one or more workload clusters)
Creating workload clusters (optional)
The target cluster acts as a management cluster. One or more workload clusters can be managed by this management cluster as described in Create separate workload clusters :
- Use
eksctlto generate a cluster config file for the new workload cluster. - Modify the cluster config with a new cluster name and different Nutanix resources.
- Use
eksctlto create the new workload cluster from the new cluster config file.